Pages

Showing posts with label home decor. Show all posts

Wednesday, 22 May 2013

Malm Bedframe Upgrade

MALM Bed frame IKEA Adjustable bed rails allow the use of mattresses of different heights.
As unconventional as it is, my daughter never slept in a crib, she transitioned from sleeping with mom and dad, occasionally in a basinet in our room to a double mattress on the floor. This worked great for us for over a year but then I was ready for the room to feel alittle more finished and alittle less ghetto-student-ish.

We chose ikea's low malm bedframe. It only raises the mattress about 6 inches off the floor which is great for a toddler and I didn't worry about her falling out of bed since it was still very low. (She fell off the mattress twice and after 3 months in the new bed - she hasn't fallen at all).

The only problem is that the side is open at the bottom. This led to alot of lost items underneath, and since its so low it was hard to reach under to retrieve things.

I cut some wood, and painted it black. Then screwed it in place (using the kreg jig to make pocket holes) under the bottom side ledge.


It's great, we can't loose toys/soothers/snacks/water bottle etc. There is only one problem - we should have screwed it further in - so that you can stand next to the bed and not hit your toes.

A quick readjustment (using mega blocks as a square to keep the wood the same distance and perpendicular) and now its perfect.


(I just need to fill in the old hole with black paint or maybe a sharpie will do the trick)

- Lauren

Wednesday, 20 March 2013

Welcome Spring!

It doesn't feel like spring yet, but I thought a quick update to my winter wreath might help.


A simple switch of thick red (and very faded) ribbon for crisp white, and red berries to yellow forsythia blooms. 

- Lauren

Monday, 4 March 2013

Kitchen Chairs upgrade

We inherited some chairs awhile ago, and they were sturdier than our current ones at the time, so we considered it an upgrade.  There was only one problem : the fabric seats were not my ideal choice (not the worst thing in the world) however I hated the fact that they were also covered in plastic. It reminded me of a friend's house growing up - whose living room furniture had plastic on it. It just seemed weird to me. Plus they were the only blue thing in the room.

Anyways, once my daughter started eating at the table, and spilling at the table, I realized that maybe covering your chairs in plastic wasn't as bad as I first thought. Then I saw that ikea sells plastic coated fabric. With less than an hour of time and two small assistants, we had drastically transformed chairs!


Now I am one step closer to a kitchen that I don't hate.

I have been trying to decide what to do with the rest of the wooden table and chairs.
I plan to leave the table top wood, and paint the base. The only thing stopping me (other than two tiny assistants) is what colour, black? charcoal? red? And then do I paint the chairs to match?

Red table with black chairs? Black Table with red chairs? Red table with wooden chairs? Black table with wooden chairs? I really like the idea of red in there somewhere, I know it will be quite a bit of colour compared to what it is right now, but I imagine something will be painted black or charcoal - only because I know I have some paint in the basement.

- Lauren

Tuesday, 13 November 2012

Mudroom Make Over : Part 1

I know that I am very fortunate to have a large entry to our house, room to take off wet/snowy coats/boots, room to keep the stroller inside etc but often it feels like a waste of space.

In attempts to finish up smaller house projects so that all renovation energy can be focused on the kitchen. I have started to do something with the entry room.

Its a room thats approximately 11 feet by 11 feet, it seems hard to focus just on storage of coats/shoes and all the other junk that accumulates as you enter/leave the house (grocery bags, tools, things to be returned, garden related items, etc). So I have decided that this room will hopefully also one day work as a home office type space, somewhere to sit, keep some files, store some books, crafty things, etc

Step one was trying to reduce the un-necessary stuff in this room, and then I painted it. My plan was to have this part finished in October. I still feel relatively on-track seeing as its not yet the middle of November, and lets be honest its hard to get stuff done during nap time.

Before Pics:


After Painting and a little rearranging/purging:
(ok, there is actually a little bit left to paint, and I actually didn't paint behind the blue storage unit.......but I am so close and I figured if I didn't post this right now.......it might have taken me another month!)


I also quickly painted the door charcoal grey. I love it..... from a distance, up close I know I will have to do a better second coat in the spring, when I can remove the glass insert to properly paint around the faux french door details.

Part 2 plans include:
- replacing the blue storage unit (which very clearly does not go in this room any more) with a wardrobe unit to store coats/shoes/hats etc as well as the vacuum I am sure more than I can imagine right now.
- An upgraded bench with storage (the shelves that are there now are just a place holder and are currently working quite well)
- a shelf to keep some of our books (ideally close to the ceiling to maximize use of wall space, plus they aren't accessed very often anyways so its ok if they aren't within arms reach. At least having them out on display will make them easier to access than having them in a pile on the floor of the spare room or still in boxes)
- lower hooks for my daughters coat and other bags etc.
- microwave relocated to the kitchen (although I have no idea where that will go exactly)

Part 3 plans (which might all be part of my dreams and not reality) include:
- removing the built-in closet (which is behind the door when you enter the room)
- adding a desk in its place with some built-in storage for files, and other office-y type stuff.

My hopes is to have Part 2 finished by Christmas. we will see how that goes seeing as its only 6 weeks away.

oh, and I want to replace the light fixture too, but I don't think I am willing to go out specifically to buy something so I will wait for awhile and see what comes of that.

- Lauren

Friday, 10 August 2012

DIY Roman Blinds

Inspired by a friend who recently made roman blinds for her new cottage, I followed the same online blog tutorial and made some for my guest room.


They are alittle too narrow and probably hanging too far out (since I just hung them from the existing curtain rod). But they are much better than what used to be there and I didn't have to buy any new material. I figure I could just add some black trim to make them wider if necessary.

- Lauren

Wednesday, 2 May 2012

Bathroom Upgrades

Its been almost a year and a half since we started our bathroom reno's

This involved ripping everything except the bathtub and surround out. Luckily we have a second full bathroom on the main floor.

The original bathroom when we got the house about 8 years ago had an avocado tub and toilet, dark green wall paper border and sliding glass shower doors. I can't remember 100% but I think it was painted baby blue. (unfortunately I don't have any pictures)

Back in 2007, I removed the glass shower doors, removed the wallpaper and painted the room yellow. This satisfied me for a while. (I couldn't even find pics from this either)

Then in 2008, we replaced the bathtub and surround. (still no pics.....)


Finally in 2011,
- we replaced the vinyl flooring to heated faux slate tiles (heated floors are amazing)
- replaced the green avocado coloured toilet to a dual flush white model
- replaced the light fixture and added a second light to the shower area.
- added an exhaust fan
- upgraded the window
- we designed and had the mirror built
- we designed and had a new vanity custom built for maximum storage and for our new 'wetstyle' double faucet sink.

The room has been so close to being finished for about 6 months now. In March we finished installing the trim and last month I finally caulked it.

We have plans to do a tile backsplash, we have even bought the tile. I guess this is probably a project we should do before the kitchen is started.......perhaps this will motivate me (us).

Does it take anyone else this long to finally finish stuff?

- Lauren

Friday, 13 April 2012

Kitchen Progress

So I've been thinking about kitchen layouts for about 6 months now and finally thinking I had figured out the best one.  I even marked the floor with masking tape to see where things would move and to be able to see the distance between moved items.  However, I am once again not 100% convinced that its the best for the space.......


In the mean time, I have started painting the walls, since we plan to open up the space to the living room, and since I never loved the orange colour I painted 5 years ago.  I used leftover living room paint to get me in the right direction.  I just did a quick coat for a general vibe.  I don't love the colour, I think its too plain.  It looks pretty good with the white trim, but not great with the wood cabinets or ugly backsplash - both which are going to eventually be replaced.  My next painting project is to paint the adjacent basement stairs area charcoal grey to see if I like the two colour combo.

Also in kitchen reno baby steps, we replaced the light.  The lighting in the kitchen was awful.  You couldn't tell if it was even on or off during the day.  At night it created all sorts of weird shadows and never fully lit the room.  We choose an inexpensive one from Home Depot.  Even if we don't keep it, I won't feel like we wasted any money (plus it could move rooms or we could sell it on kijiji).


Finally we replaced our leaky Kohler faucet.  We debated trying to fix it or get it replaced since apparently it has a lifetime warranty.  I knew I wanted a new faucet in our 'new' kitchen one day, so this seemed like a good time to upgrade. I wanted something with a higher faucet. And my husband wanted a pullout, instead of the side pullout.  We bought a Grohe which was almost 50% on sale (we still plan to fix the Kohler, it seems to have been leaky due to a lot of hard water buildup and it might get put into the laundry room but maybe its too nice to go there).

And finally, I have a new kitchen layout.  It's just a rough sketch but it has some improvements from the previous one.  It has more prep space.  It has a small moveable island/cart plus a table.  It would mean opening up the existing window into the living room instead of fully removing the load bearing wall (this seems cheaper.....).  I am not sure if the table would impede the traffic flow in and out of the doors too much or if it would be fine as long as the chairs were tucked into the table.


I know that I need to finish some other projects before diving into this one, but I think there might be some cabinet removal or bulk head investigation soon (I want to see if there is something in there or if it will be possible to remove them) - I just need to convince my husband to help!

- Lauren

Wednesday, 4 April 2012

Kitchen Plans

I spend alot of time day-dreaming about our kitchen possibilities. I am trying hard to keep the focus on finishing other projects before starting any new ones, but we all know that one day there is gonna be something drastic done during nap time. Cabinet removal? Fridge moving? Who knows what its gonna be.

The first step was figuring out the new layout. Here is the current state:
(yes, done on graph paper, each square is one foot)


Some good things about the kitchen is the storage.

Some things that could be improved:
- counter prep space
- lightening
- space for a table without hitting the fridge
- room to open the door to the basement
- more open-ness to the rest of the house so that you aren't stuck in the kitchen when people are visiting.
- take advantage of the unused front entrance space behind the kitchen.

After many attempts, this is what we came up with.

Open up the wall behind the stove and take advantage of the unused front entrance. Although this means you are walking right into the kitchen, since we don't use this entrance we are treating it more of getting more window light. (this is not a load bearing wall)

Currently there is a small window opening in the wall to the living room, we plan to open this up quite a bit - this will be more work involved since it is a load bearing wall.


We plan to have no upper cabinets along the sink/dishwasher/stove wall. This should make it open, especially with all the windows (yes, there was a window in the front door closet - weird).

Basically we are switching the 'pantry' wall from the first sketch with the fridge&cupboard.
And then taking the stove section and swinging it 90 degrees to be inline with the sink.

This means that we are approx same cupboard space. More useable counters (no corners which are pretty much wasted - same as counter cupboards, currently ours is pretty sparse)

Since the front door is going to open into the kitchen, I think its good to have a coat closet there - as I said we don't plan to use the entrance or store coats there but for resale somewhere down the line, we will use this as a huge pantry.

People always say you need your fridge, sink and stove within such and such a distance, I don't think our plan quite meets those rules, but this is almost the same distance/layout of appliances as my parents, so I feel good about it.

So what do you think about the layout? anything I am overlooking/forgetting something?
All Opinions are wanted - this is a big project, I don't want to have overlooked something.

- Lauren

Tuesday, 13 March 2012

Forcing Spring

We have had a very mild winter, and it has felt like spring many times the past 6 weeks or so, I think we are almost there but I couldn't wait any longer. I cut some forsythia branches from my yard, put them in water and in a sunny window and waited for spring to bloom inside.

After some googling alittle, some people say to cut the branches under water, some say cut up the stem, or bash the stem (which is very woody). I just cut them outside and came in put water in a vase and placed them inside. Maybe you would get faster results with some tricks but I didn't use or need them.

I think it was my parents who mentioned doing this, it seems to be pretty common with forsythia which is one of the first bushes to bud in the spring. Its the one that flowers first with bright yellow leaves and then turns green for the remainder of the year.

Here are some pics after 4 days: finally starting to see some buds doing their thing.


After 6 days: green & yellow everywhere almost ready to open up.


Today, day 7. I woke up to open yellow blooms! 


I think tomorrow (and the next week or so) will be more and more yellow!

-Lauren

Wednesday, 7 March 2012

Bathroom Ceiling Transformation


Unfortunately I don't have a 'before' picture, but our bathroom ceiling was pretty gross.  There is no exhaust fan in there.  It had probably been painted with the wrong paint and was peeling, discoloured, uneven and all around gross.

Since its not our primary bathroom, we decided not to install an exhaust fan.  Plus, there is a window if necessary.  I told my Dad that I was thinking about tin tiles.  I thought it would be a good room to do it in since its small and wouldn't cost too much or be too much work installing.

One day he came over with a roll of wall paper - from the discount bin. It had only cost him $5! and he even installed it for me. I put up the trim, caulked it and painted the whole thing - and I love it! I didn't think it would be as obvious as it is - but a lot of people notice it when they come over.

I am glad that my dad was doing the wall papering and not me.  It definitely takes some skill (he has done alot of wall papering over the years) and the ceiling was extra fun since gravity was working against us.

-Lauren

Monday, 6 February 2012

Laundry Room Before and After

The furnace room of our house is huge (almost 12 by 16 feet), so we decided to move our laundry into that space to allow for more livable space in the rest of the basement. The room started with furnace, water heater, water softener in an un-insulated room.

These before pics show the dryer moved approximately into place, and the water softener didn't move, and a new furnace replaced the old one. Otherwise everything else is pretty much changed/new. (note to self : take better 'before' pictures).
First picture: Looking into the room, furnace on the right and then the water heater (just made it into the pic) and then there is a door past there leading to the cold cellar. On the left there is the water softener, then exhaust going up the chimney and then the dryer.
Second pic is taken standing in front of the cold cellar door looking out of the room (you can see the water heater/furnace exhaust and the water softener in the corner.

So now what we did with the room

When we got the new furnace, we had the water heater moved next to the water softener (under the big water rust stain - I believe this was a result of a old damaged chimney liner, we have a new one so no more damage will continue). This also got rid of the exhaust pipe that went across the room which makes the room instantly feel MUCH bigger.

We used the furnace install as an opportunity to  put down a piece of vinyl flooring. Its cheap, washable, and has no seams to deal with for install. We choose a in store option from Home Depot, the pattern looks like tiles.  We might have been able to get something awesome if we special ordered it but we wanted to take it home with us right away and its fine. Sometimes less choice is better because then you can make a decision faster based on the two available options.

We framed and insulated the two exterior walls. We left the two interior concrete walls as is.  We choose not to finish the ceiling since its a utility room and then we still have access to plumbing/gas/etc.
This could still be done at a later date.

New plumbing was added for the laundry and relocated water heater. This allowed us to slowly start replacing some of the old steel water lines and replace them with copper. They were pretty corroded and we have been told that by replacing them we should be able to improve our water pressure (once the pipes aren't full of gunk).

New electrical was also added for the laundry, dryer and some regular outlets.

While we were doing the work in the laundry room, the rest of the partially finished basement was being demolished. The room had 1inch white styrofoam 'insulation' behind wood paneling. I took this opportunity to put some sweet wood panelling in the laundry room.

1) It was free. 
2) It prevented it from going to the dump. 
3) It was essentially already cut to size.
4) It was easier than drywall since we wouldn't have to tape/mud/sand. 
5) I was going to paint it.
6) Its a laundry room so it doesn't have to be a show room

Result - I love the painted panelling!

I have decided to paint the main part of the basement (currently under construction) a charcoal grey. So I painted the laundry room a nice light warm grey. The two colours are 'revere pewter' and 'kendall charcoal' from Benjamin Moore - and then colour matched and mixed at Home Depot.

The cold cellar door - was doctors office green, now charcoal grey. Love it.


The baseboards are wood, and not mdf, just since there is potential for flooding since its a basement and a laundry room. Once mdf gets wet its over. We bought primed finger joint pine and it seemed in the comparable price range although I can't remember the prices and might have just convinced myself. Buying primed was so much easier. Its pretty substantial baseboards but we are trying to match with the era of the house and the original woodwork on the main floor. (the new stuff is just 1 x 6 's with a quarter round along the floor but its pretty close).

Currently there is a square folding table with some boards on it. Still not totally sure where a table should go in the room. where it is or as a continuation to the sink. So thats still in process. I plan to build some table something with the wood - which matches the shelves on the wall.


We hung some shelves on the far wall. They were in the pile of stuff to potentially be thrown out and so I used them. They have a nice warmth to the stain and work perfectly. The brackets seemed kinda expensive for free shelves but probably still cheaper than buying the whole assembly. (I think they were $9 each).

The stuff on the shelves doesn't look too pretty, maybe I should have opted for closed storage, then again this is a utility room. I plan to get a few more boxes/baskets for organization and appearance.

Hung the ironing board - kinda looks like art. Not a whole lot of ironing gets done in our house but when it does, it will happen in here.


 We used our old dirty laundry sink. We thought about buying a new one but since the laundry room is for messy things like washing paint brushed and etching mirrors. There was no need for a shiny new one that we might be mad at ourselves once we make the first stain. I don't think I have ever soaked clothes in it - which I assume was a previous use. I just put something right in the washing machine if I am worried about a stain setting in.

You probably notice that there is no faucet on the laundry sink. Its not a priority yet, so nothing has been done. I don't want a basic utility one and the thought is to use the one from our current kitchen when we upgrade it. Yes I love re-using thing.

The window should be replaced in the near future, complete with window ledge and trim.

And of course my new etched mirror is hung.


So there is no door yet, we haven't made a final decision about what we will put there, re-use a door from the main floor? buy a new door? make our own barn style sliding door? 

There is still some finessing that needs to be done, but if I waited until it was perfect then you would probably never see it!

- Lauren

Sunday, 22 January 2012

New Kitchen Cabinets!

Yep!   Our kitchen cabinets are finally in :)

When our kitchen was first designed, this space was initially meant for a big comfy chair to go there, but instead.. we put a couch and table in the other end of the kitchen.  Then, the area meant for the chair just became random storage and unused space. So, we decided to finish out the cupboard with a final cabinet to match the rest.

The final results are so good! The kitchen now feels finished, and I love it

 Before Photos:


After photos:

I'm very happy we choose the open shelves, its a great pop of colour in the kitchen


 - Leah

Sunday, 15 January 2012

Mirror Makeover - DIY Laundry Room Art

In a combined effort to clear the basement of stuff as we renovate (an old mirror from a old medicine cabinet) and to add some finishing touches to my new laundry room (full blog reveal soon).

And with inspiration from here and here. I etched a sign into the mirror that otherwise would have probably headed to the garbage soon.

First I covered the mirror in painters tape, then wrote my stuff with a marker, and then used a razor blade to cut away the letters, leaving a stencil with the exposed mirror the part that I wanted to etch.


I bought some glass etch cream from Michaels (using a 40% off coupon of course). My stencil wasn't one of the listed types, so I just applied with an old paint brush and then washed it away.


I was worried that the acid would eat away at the tape, so I applied it as fast as I could and then immediately washed it away. It didn't seem to do much so I re-did the process (waiting alittle bit longer - although I didn't look at a watch at all so not sure how much time actually passed) and after the second application, I washed it and removed the tape.


The finished product isn't super crisp or even but it also makes it look kinda aged which I liked. Its fairly subtle but I am happy with the result.

Soon I will show it hanging in our new 'almost' finished laundry room.

-Lauren

Tuesday, 3 January 2012

Hallway Photos

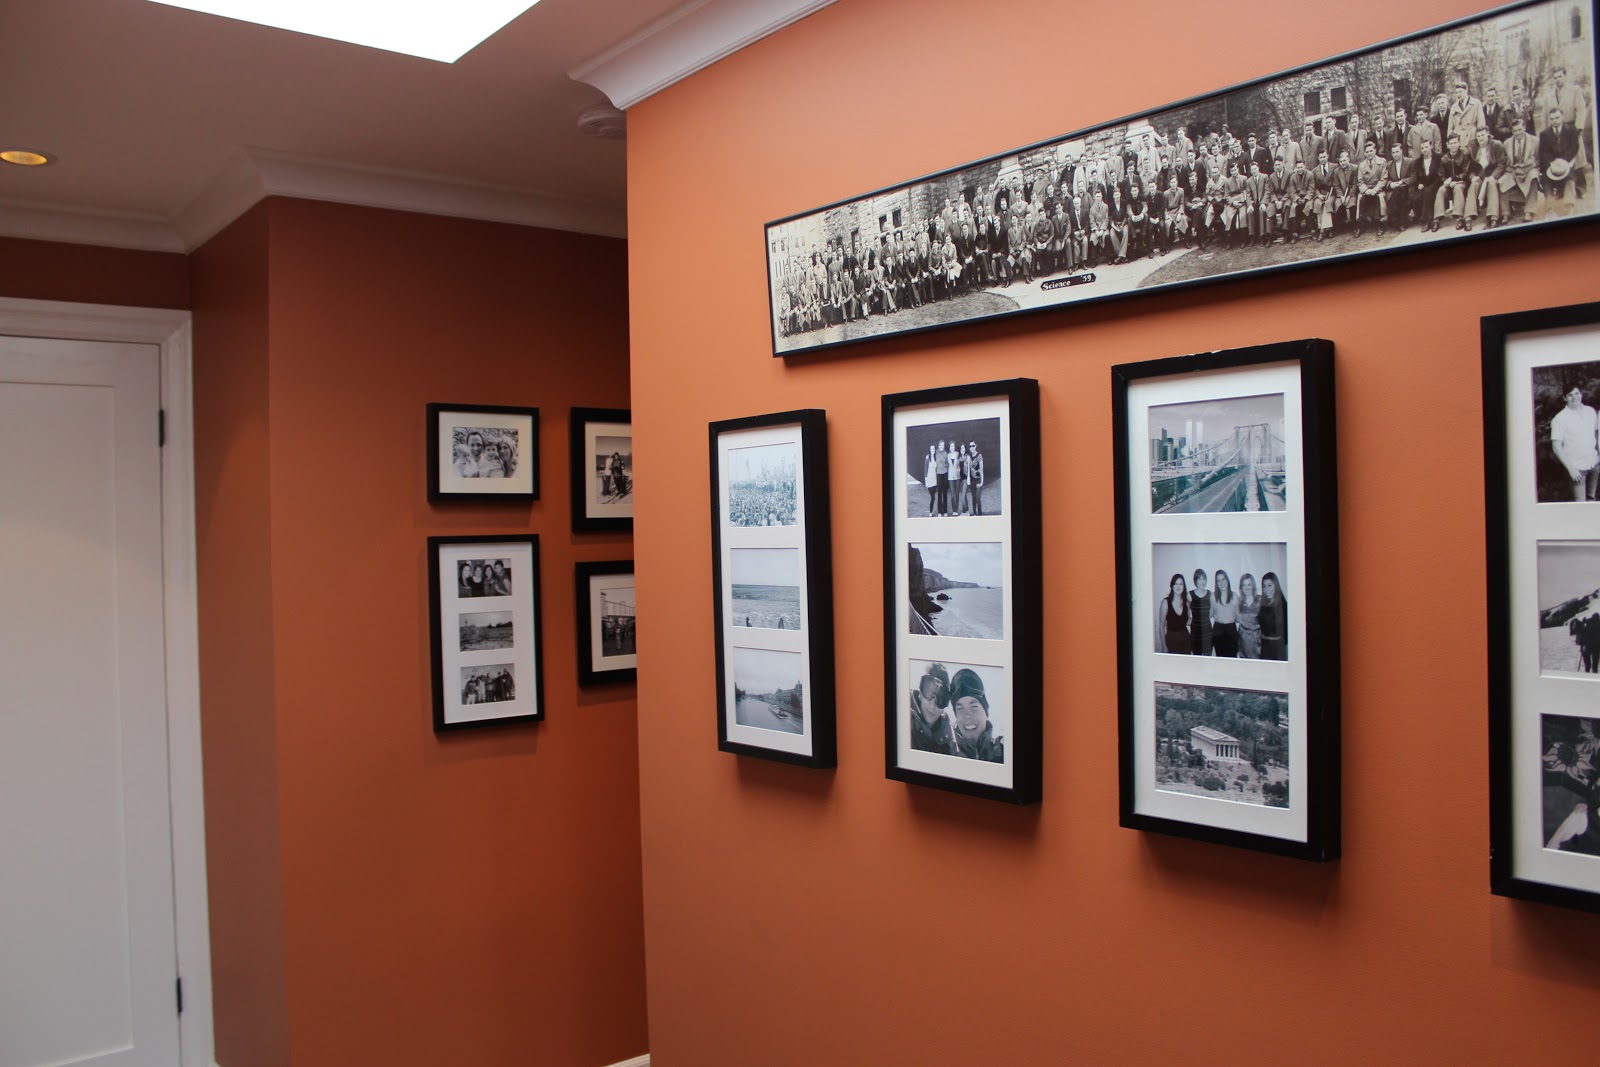
One of our projects over the holiday break was to finally finish up our hallway. From the beginning, Craig and I had the same goal of creating a hallway with a bold statement and fond memories. (It just took a few years to FINALLY finish).

We decided on black photo frames, with white matting on our bold rusty orange "L" shaped hallway. All of our frames are symmetrical, with an equal balance on either side.

We mixed in photo frames with a few other interesting pieces.

For example, we have a very neat photo of Craig's grandfather's graduating class at Queen's University from 1939.

We also used the original copy (which was boarded and laminated) of an Auction list from 1917 when Craig’s Great Grandparents immigrated to Canada from England.

Finally, we framed Cheques from the 1860’s, when Craig’s Great, Great, Grandfather ran a hotel in New York.

Definitely some very interesting, and neat family heirlooms, and I am very pleased with the results!


-Leah

Tuesday, 29 November 2011

DIY Holiday Wreaths


I made a typical Christmasy wreath a few years ago and its done me well, but I decided this year I wanted to try something new, something that would last longer than just Christmas, and my plan is that I can continue to change it with the seasons. I made a grapevine wreath. Its pretty simple and minimalistic. It might get some additions but currently I am happy with it and I love that I can also see it inside through the glass window.

(Please excuse my slanty photography skills). The other thing that excites me about my new wreath is how easy and how cheap it was! I used a 40% off coupon from Michaels (you can print them from their website if you don't get their flyers in the mail) and the wreath cost $2.70 including tax!!!! I already had the ribbon and the berries left over from other projects! I looped the ribbon over the wreath and used a tack in the top of the door. EASY and FABULOUS!

I still had my 'old' wreath hanging around, so I hung it on my garage.

I noticed that you can buy basic wreaths made from fresh pine branches - I think I will have to try that one year - you would smell it every time you walked in the door!

Do you have a wreath? Get a new one every year? Have the same one up all year? Think you might make one this year?

-Lauren